|
Yes, even if the image is shot without the DRO function, you can apply its effect to the RAW image using the [D-Range Optimizer] settings.
<About the [D-Range Optimizer] settings in Image Data Converter SR >
- When setting to [Auto]:
The effect equivalent to the Advanced or Advanced: Auto mode* in the DRO function of the camera is automatically obtained.
* The mode name varies depending on the camera.
- When setting to [Manual]:
You can manually adjust the effect using the [Highlight] and [Shadow] sliders.
* If your camera has the Advanced: Level mode or the DRO advanced bracket shooting mode, Image Data Converter SR does not have a setting to automatically reproduce the effects of those modes. Please set [D-Range Optimizer] to [Manual] and adjust to the appropriate correction level.
|
 |
|
|
The image recorded in the RAW format is the raw data directly captured by the image sensor, and the DRO effect cannot be seen in this data itself.
Using the [D-Range Optimizer] settings, you can apply the DRO effect to the RAW data. [Auto] (equivalent to the Advanced or Advanced: Auto mode* in the camera) and [Manual] are available for the [D-Range Optimizer] settings.
* The mode name varies depending on the camera.
* When playing back the RAW image on the LCD screen of the camera or PMB (Picture Motion Browser), the small JPEG image recorded with the RAW data is displayed so that you can see the DRO effect.
However, if the image shot with the modes other than the Standard mode in the DRO function or the DRO advanced bracket in the Drive mode (if available) is enlarged on the camera's screen, you cannot see its effect due to system restrictions.
|
|
|
|
Items that can be selected in Creative Style differ.
For ARW2.1 files, you can use up to 13 items such as “Standard”, “Vivid”, “Portrait”, “Landscape”, “Clear”, “Deep”, “Light”, “Sunset”, and “Night view”, depending on your camera.
For ARW2.0 files, you can use up to 13 items such as “Standard”, “Vivid”, “AdobeRGB”, “Neutral", "Portrait”, “Landscape”, “Clear”, “Deep”, “Light”, “Night view”, “B&W”, and “Sepia”, depending on your camera.
For ARW files shot with the DSLR-A100, you cannot use the Creative Style function.
|
|
|
|
For JPEG or TIFF images, you can only adjust the tone curve and peripheral illumination, or rotate the image.
|
|
|
The "Bionz" processing engine installed in the camera and the processing engine of Image Data Converter SR are optimized to the respective characteristics (hardware vs. software). Therefore, processing is different in each case, resulting in differences in the DRO effect.
The followings are some tips for adjusting the image by setting [D-Range Optimizer] to [Manual].
- Adjust the gradation of highlighted areas with [Highlight] and the details of shaded area with [Shadow] according to your preference.
- Adjust [Brightness] accordingly as it is closely related to the DRO effect.
|
|
|
|
When an image is opened with an external program by clicking the external program button from Image Data Converter SR, a file named “EXP0xxxx.JPG” or "EXP0xxxx.TIF" (xxxx = 4-digit number) is created in the specified location which can be checked as follows.
Click [Settings...] in the [Tools] menu.
[Save in:] in the [External Programs] tab shows the location to save.
* The original file name will not be retained.
If you edit the image with the external program and overwrite the file, the above will be the name and location of the file saved with the external program.
If you rename the file or change its location with the external program, you can delete the above file.
|
|
|
|
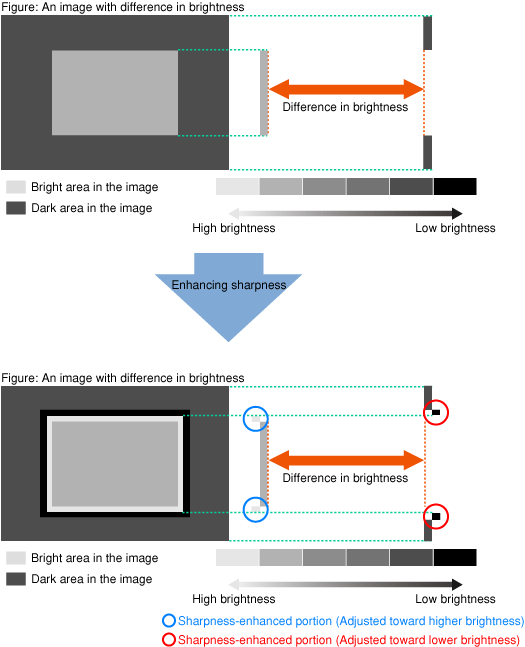
You can adjust the degree of outline enhancement using these items. [Overshoot] adjusts the bright portion, [Undershoot] adjusts the dark portion, and [Amount] adjusts both.
With [Threshold], you can specify the value of the difference in brightness to decide whether or not to perform
sharpness.
When the difference in brightness exceeds the threshold, sharpness is applied.
You can increase the degree of enhancement by moving the slider to the right or clicking the “+” button.
You can also decrease the degree of enhancement by moving the slider to the left or clicking the “-” button.
* If the value of each item is set to 0, the one used during shooting is applied to the image.
|
|
|
|
Due to the shortage of memory, unknown errors may occur when converting files.
Please try the followings.
- Close other applications.
- Retry after a while so that the virtual memory may be freed.
- Increase the amount of RAM on the computer, if possible.
Increase the amount of virtual memory as follows.
For Windows(R) XP:
Select [My Computer] - [Control Panel] - [System] in this order. Click the [Advanced] tab, and click [Settings] in the [Performance] frame. Click the [Advanced] tab, and check the [Total paging file size for all drives:] part in the [Virtual memory] frame. Click [Change], and enter values in the [Initial size] part. Click [Set], and click [OK].
For Windows Vista(R):
Select [Computer] - [Control Panel] - [System and Maintenance] - [System] in this order.
* For Classic view, select [Computer] - [Control Panel] - [System] in this order. Click the [Advanced system settings], and click [Settings] in the [Performance] frame. Click the [Advanced] tab, and check the [Total paging file size for all drives:] part in the [Virtual memory] frame. Click [Change], enter values in the [Initial size] part.
Click [Set] and click [OK].
* Remove the check of [Automatically manage paging file size for all drives].
|
|
|
|
For Windows:
Please install the older Image Data Converter SR in version order after uninstalling [Sony Image Data Suite] from [Add/Remove Programs] or [Uninstall a program].
For Macintosh*:
Please follow the steps below.
Delete [Sony Image Data Suite] from [Applications].
Start Finder to display [DEVICES] - [(HDD name)] - [Library] and delete the [SIDS_INST.pkg] icon in [Receipts]. Install the older Image Data Converter SR in version order.
* You cannot install the older version without uninstalling the newer version. |
|
|
|