Editing an Image

Editing and saving multiple images
You can use the preset image processing settings or the settings of a particular RAW file to edit and save multiple images at one time. This batch procedure is useful to edit multiple images that have been shot under identical shooting conditions.
For details on basic editing and saving operations, refer to the “Image Data Converter Guide” supplied with the software (“Image Data Converter Guide”).
- In the View Mode, select the images that you want to edit and save at one time.
- Click [Output] from the [File] menu.
The [Output] window is displayed.
- Specify the image processing settings that you want to use, and a file format that you want to use to save the edited images.
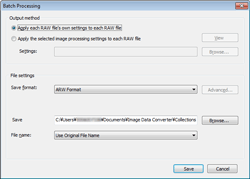
Output method Select the image processing settings that you want to use to edit images. - [Apply each RAW file's own settings to each RAW file]: Check this option to use the image processing settings saved in each RAW file to edit the file.
- [Apply the selected image processing settings to each RAW file]: Check this option to edit images with an existing image processing settings you have saved using [Image Processing Settings] command. The selected multiple images will be edited with the same image processing settings. Click [Browse] and select the desired settings. (You can view and confirm the settings by clicking [View]. )
File settings From the drop-down list, select a file format that you want to use to save the edited images. - [Save format]: Select the file format from ARW, JPEG, or TIFF format. By clicking [Advanced], you can set [Bit depth] (for TIFF only), [Color space] (for JPEG/TIFF only), or [Compression] (for JPEG only).
- [Save in]: Select the destination folder where the files are to be saved. You can specify the destination folder by clicking [Browse] and selecting the folder in the dialog box displayed.
- [File name]: Specify a file for the edited images. Select either [Use Original File Name] or [Specified Name], or [Date and Time Taken], or a mixture of specified name and date and time taken. When specifying a name, input the desired characters in the text box.
- Click [Save] .
The selected images are edited and saved at one time.
|
Copyright 2011 Sony Corporation
|