Printing an image

Changing the print settings
You can change print settings when you print an image.
For details on basic printing operations, refer to the “Image Data Converter Guide” supplied with the software (“Image Data Converter Guide”).
- Display the image that you want to print.
- Click [Print] from the [File] menu.
The [Print] dialog box is displayed.
- While referring to the previewed image, make the print settings.
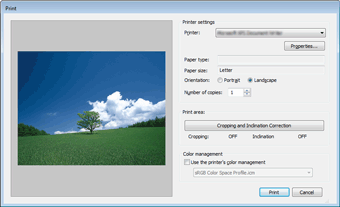
Printer settings
(For Windows)Set the printer and paper type. - [Printer]: Select the printer to be used to print the image. To make detailed settings, click [Properties] to display the [Properties] dialog box. For details, see the operating instructions of the printer you are using.
- [Paper type]: The paper type currently used in the printer is displayed. To use a different paper type, click [Properties] to display the [Properties] dialog box.
- [Paper size]: The paper size currently used in the printer is displayed. To use a different paper size, click [Properties] to display the [Properties] dialog box.
- [Orientation]: Check either [Portrait] or [Landscape], depending on the image orientation.
- [Number of copies]: Specify the number of copies to be printed.
Printer settings
(For Macintosh)Set the printer and paper type. - [Paper size]: The paper size currently used in the printer is displayed.
- [Orientation]: Check either [Portrait] or [Landscape], depending on the image orientation.
- [Page Setup]: Click this button to display the dialog window where you can specify the print paper size or other print settings.
Print area When you select a JPEG or TIFF image, the [Cropping and Inclination Correction] button is enabled. By clicking the [Cropping and Inclination Correction] button, you can specify the area to be cropped and set the angle for the inclination correction in the dialog box displayed. Color management Select this option when you want to use the printer's color management features. With this option checked, you can select a desired ICC profile from the drop-down list box.
Even if you select this option, color management cannot be used when the printer itself is set up so as not to use color management. - Click [Print] when the settings are completed.
For Windows: Printing starts.
For Macintosh: The standard [Print] dialog box is displayed. When you click [Print] on the dialog box, printing starts.
|
Copyright 2011 Sony Corporation
|