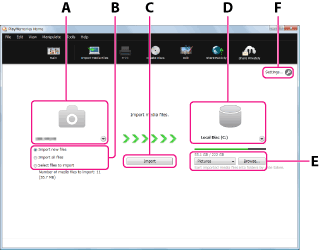
Parts and controls of the import window
When you connect your camera to a computer, “PlayMemories Home” starts, and the video/photo import window is displayed.

| A | Import source | The model name of the camera connected is displayed. By clicking  , you can select other connected devices from the drop-down list. , you can select other connected devices from the drop-down list. |
| B | Import method | Select the method to be used for importing. When you select [Select files to import], the video/photo selection area is displayed. |
| C | Import button | Click to start import of the videos and photos. |
| D | Destination drive | The destination drive is displayed. By clicking  , you can select the destination drive from the drop-down list. , you can select the destination drive from the drop-down list. |
| E | Destination folder | The destination folder for imported videos and photos is displayed. By clicking  , you can display the name of the destination folder currently set and a history of the destination folders to which you have imported videos and photos before. When you click [Browse], the folder selection window is displayed, and you can select the destination folder. , you can display the name of the destination folder currently set and a history of the destination folders to which you have imported videos and photos before. When you click [Browse], the folder selection window is displayed, and you can select the destination folder. |
| F | Settings | You can change various settings, such as whether to delete videos and photos imported to a computer from the camera, whether to turn off the camera automatically after import, whether to import videos and photos automatically using Wi-Fi, or whether to retain a GPS track log, etc.
|