Inserting date
You can insert a date stamp into photos. The display format, color, and position can be specified.
-
Click [
 Tools] on the top-right of the main window and then click [
 Edit Media Files].
 -
Click [
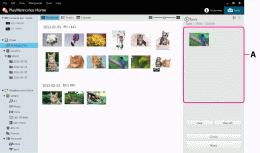
 Adjust Pictures], select the photos you want to edit from the thumbnails, and then drag and drop them into A.

-
Click [Next].
-
Click [
 Insert Date].The inserting date window is displayed.
 -
Select [Format], [Color], and [Position], and click [OK].
A date stamp is superimposed on the photo. -
Click [Save] or [Save As] to save the corrected photo.
To overwrite the original image file, select [Save].
To save the corrected photo as a new image file with a new name, select [Save as].
 Hint
Hint
- Click [Reset] to return the photo to its original condition.
Note
- You cannot edit RAW mode images or Sweep Multi Angle photos.