Creating a DVD disc with One Touch
You can save videos and photos recorded on your camcorder on a DVD disc just by pressing the DISC BURN button on your camcorder. Videos and photos that have not yet been saved on a disc with One Touch Disc Burn can be saved on a disc automatically. Videos and photos are saved on a disc at their recorded image quality.
 Note
Note
- Videos recorded using the [HD FX] or [HD PS] mode cannot be saved on a disc. In addition, AVCHD 24p/25p format videos recorded using the [HD FH] mode cannot be saved on a disc.
-
Place the recordable DVD disc to be saved in the disc drive of your computer.
The following 12 cm discs can be used.
Disc types Characteristics DVD-R
DVD+R- Unrewritable
DVD+R DL - Using the double layer DVD+R system containing more recordable capacity
- Unrewritable
DVD-RW
DVD+RW- Rewritable and reusable
-
Turn on your camcorder, and connect it to the computer using the USB cable.
Use the AC Adaptor as the power source.
For how to connect your camcorder to a computer, refer to the Operating Guide. -
Press the DISC BURN button.
For operating the DISC BURN button, refer to the Operating Guide.
The disc recognition window is displayed on the screen of the computer.
When the disc is recognized, disc creation begins.
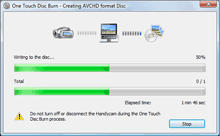
When the disc creation is completed, the disc tray opens automatically.
 Hint
Hint- When you cannot store all the recordable data on a disc, follow the on-screen instructions, then insert a new disc into the disc drive.
To save videos and photos recorded on a memory card
- On the [USB SELECT] screen displayed on the LCD screen of your camcorder after step 2 of “Creating a DVD disc with One Touch,” select [USB CONNECT].
-
Select [Start] - [All Programs] - [PMB] - [
 PMB Launcher].
The [PMB Launcher] window is displayed.
PMB Launcher].
The [PMB Launcher] window is displayed. - Select [Disc creation], and then click [One Touch Disc Burn].
Changing the settings of One Touch Disc Burn
You can change the DVD drive used for creating a disc, the location used to store temporary files, or the maximum writing speed for a disc.
-
Select [Start] - [All Programs] - [PMB] - [ PMB Launcher].
The [PMB Launcher] window is displayed.
-
Select [Tools], and then click [One Touch Disc Burn Settings].
The [One Touch Disc Burn Settings] window is displayed.
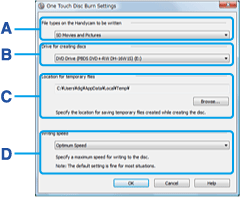
A [File types on the Handycam to be written] Select the types of videos and photos to be written. B [Drive for creating discs] Select the drive you want to use to create a disc. C [Location for temporary files] Specify a folder to be used to save temporary files in the window displayed when [Browse] is clicked. D [Writing speed] Select [Optimum Speed] for normal usage. If disc creation failure persists, select lower speed. - Click [OK] when the setting is completed.
Hints on using One Touch Disc Burn
- Video and image data previously saved on a disc in this operation cannot be saved again with the same operation. To save data on a disc again after it has been saved previously, import the videos and photos to a computer, and then save the data on a disc.
- The history of each saved video or photo is recorded according to the user account. If you use a different user account, the video or photo that has already been saved to a disc is written to the disc again.
- When you save videos and photos on several discs, the photos are recorded on the first disc.
- The sound quality remains as it is when you save a video recorded in 5.1ch surround sound on a disc.
- 8 cm discs are not supported.
- It is recommended that you use a new recordable disc.
- When you insert a burned DVD-RW/DVD+RW in the disc drive, a message appears, asking if you want to delete data saved on the DVD.
Notes on One Touch Disc Burn
- During disc creation, do not apply vibration to the camcorder. The disc creation may be terminated.
- Make sure no other USB devices are connected to your computer.
- After creating a disc, check that the disc can be played back properly on a computer with Player for AVCHD, the AVCHD playback software supplied with your camcorder, if the disc is high definition image quality (HD) in AVCHD format, or on a DVD player if the disc is standard definition image quality (STD). When you cannot play back the disc properly, import the videos and photos to the computer, and then save the data on a disc.
- To copy a created disc, use the supplied disc copy software, Video Disc Copier.
- You cannot save the videos and photos on the hard disk of your computer in this operation.
- You cannot delete the videos and photos on the hard disk or internal memory of the camcorder or on a memory card in this operation.
- You cannot edit the videos and photos on the created disc with a computer. When you want to edit the videos and photos with the computer, import the videos and photos onto the computer first.
- If the disc creation operation ends unexpectedly when you are saving videos and photos to multiple discs, the last file completed properly on the disc is saved correctly. When you create a disc with the One Touch Disc Burn function next time, the image data file that wasn't completed on the disc at the time the operation was interrupted will be the first one to be saved. When you save videos and photos to only one disc, all of the image data files will be saved to the disc again.
- When an AVCHD format disc with high definition image quality (HD) is played back, there may be a pause for a few seconds between each video, depending on the player.
- You cannot create a Blu-ray Disc using this function.
- Use a disc produced by a reliable manufacturer. You may not save images correctly when using a low quality disc.