|
If the DVD recorded in the AVCHD 1080i format is not recognized in the DVD drive of your computer, make sure the following.
Double-click the [My Computer] in your computer, and make sure the menu displayed when you right-clicked the DVD drive in which you set the DVD.
If the [Use with UDF Reader] is not shown on the displayed menu:
Select [Properties] in the displayed
menu, and make sure that there is the [UDF Reader] tab in the
[Properties] screen.
- If there is no [UDF Reader] tab
Installation
of the application may not be completed. In this case, re-install
the application. The Sonic UDF Reader is used to recognize the
DVD with AVCHD 1080i format. If you want to install the Sonic
UDF Reader only, see here. - If there is a [UDF Reader] tab
Take the following operations to enable the UDF Reader.
For Windows(R) XP
Select the [UDF Reader] tab, check [Enable UDF Reader on your drives],
and click [OK] to close the [Properties] screen.
For Windows(R) 2000
Select [Start] - [Programs] - [Accessories] - [Command
Prompt]. Enter the [dla.exe enable F:](*), and press the [Enter]
key.
* F: the alphabet that shows the name of drive of the DVD drive in which you set the DVD recorded in the AVCHD 1080i format. The name of drive differs according to your computer environment.
If the [Use with UDF Reader] is not checked on the displayed menu:
Click [Use with UDF Reader], and check it. The Sonic UDF Reader is used to recognize the DVD with AVCHD 1080i format. The Sonic UDF Reader is not applied to multiple DVD drives.
|
 |
|
|
Make sure if the 
is displayed on the task tray. If it is not displayed,
select [Start] - [All Programs] ([Programs]
for Windows(R) 2000) - [Sony Picture Utility] - [Tools]
- [Media Check Tool].
If you set the disc such as CD-R and DVD-R in the computer, automatic import of still images is not executed. If you import the media files
recorded in the disc, select [Import Media Files] in the
[File] menu of the Picture Motion Browser, and specify
the drive in the [Import Media Files] screen, and click
[Import].
|
|
|
|
Make sure if the
is displayed on the task tray.
If it is not displayed, select [Start] - [All Programs]
([Programs] for Windows(R) 2000) - [Sony Picture Utility]
- [Tools] - [Media Check Tool].
|
|
|
|
Due to the memory installed in your computer, unknown errors may occur while video files are edited or the DVD authoring is run.
Take the following steps to increase the virtual memory.
For Windows(R) XP:
Select [My Computer] - [Control Panel] - [System] in this order. Click the [Advanced]
tab, and click [Settings] in the [Performance]
frame. Click the [Advanced] tab, and check the [Total paging file size for all drives:] part in the [Virtual memory] frame. Click [Change], and enter values in the [Initial size] part. Click [Set], and click [OK].
For Windows(R) 2000:
Select [My Computer] - [Control Panel] - [System] in this order. Click the [Advanced] tab, and click [Performance Options] in the [Performance] frame. Check the [Total paging file size for all drives:] part in the [Virtual memory] frame. Click [Change], and enter values in the [Initial size] part. Click [Set], and click [OK].
For Windows Vista:
Select [Computer] - [Control Panel] - [System and Maintenance] - [System] in this order.
* For Classic view, select [Computer] - [Control Panel] - [System] in this order. Click the [Advanced system settings], and click [Settings] in the [Performance] frame. Click the [Advanced] tab, and check the [Total paging file size for all drives:] part in the [Virtual memory] frame. Click [Change], enter values in the [Initial size] part. Click [Set] and click [OK].
* Remove the check of [Automatically manage paging file size for all drives].
|
|
|
|
This is because [Drive Settings] of Player for AVCHD is set to [Memory Stick] or [Removable Disk], and the software cannot recognize the disc inserted in the DVD drive.
In this case, set [Drive Settings] to the drive in which the disc is inserted.
* To change [Drive Settings], click  in the Player for AVCHD window and select [Drive Settings].
|
|
|
|
A possible cause of this symptom is the lack of the [MEMSTICK.IND] file in your "Memory Stick Duo". This file is originally stored in a "Memory Stick" or a "Memory Stick Duo" and usually has the hidden file attribute.
If the [MEMSTICK.IND] file does not exist in your "Memory Stick Duo"...
- Even if you try to start up Handycam Utility manually, the error message appears and it fails to start up.
- If SD movies or still images are recorded on the "Memory Stick Duo", the [Import Media Files] window may appear. However, you cannot import HD movies with this window.
In this case, please download and copy the [MEMSTICK.IND] file to your "Memory Stick Duo" as follows, and then import the movies using Handycam Utility.
 Note
After the importing is completed, please be sure to format the "Memory Stick" with your camcorder.
Right-click here and select [Save Target As] in the displayed menu to download the [MEMSTICK.IND] file (file size: 0kbyte).
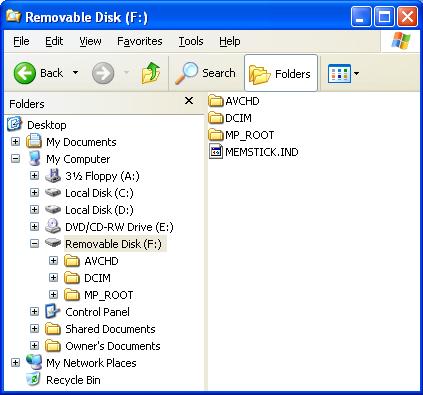
* Please be sure to right-click the link. If you left-click, the file may not be downloaded properly. Copy the downloaded [MEMSTICK.IND] file to the root folder of your "Memory Stick Duo" as in the following image.
* The file extension (.IND) may not be displayed depending on the setting of your computer.
* This image is from Windows(R) XP. Display may be different depending on your OS.
Note
If the [Confirm File Replace] window appears when you try to copy the [MEMSTIC.IND] file to your "Memory Stick Duo", the file already exists, and there may be other cause. In this case, click [No] on the window, and reinsert your "Memory Stick Duo". If your camcorder is connected to your computer via USB, disconnect and connect it again.
|
|
|
|